If you purchased or upgraded PHPRunner, ASPRunner.NET or ASPRunnerPro recently you may have noticed that we are using a new checkout solution based on Invoice template. In this article we will show you steps required to add this kind of functionality to your project.
To see how it works live proceed to PHPRunner purchase page, select Edition, enter your email address, add more options on the next screen and click Continue.

Sample code is PHP only. We will add C# code soon too.
1. SMTP settings
Make sure you specified correct SMTP settings in PHPRunner/ASPRunner.NET. We will need this to send email receipts.
2. Change admin password
Build application, logon as admin/admin and change admin password.
3. Change Paypal/Stripe settings
Go to Settings in web application and provide Paypal and Stripe settings in order to use both payment methods.
4. Sending email receipts
Now there is something interesting. Proceed to Editor, create folder ’email’ under ‘Custom files’, create subfolder ‘english’ there (of whatever language you use in your project). Create file named orderemail.txt there.
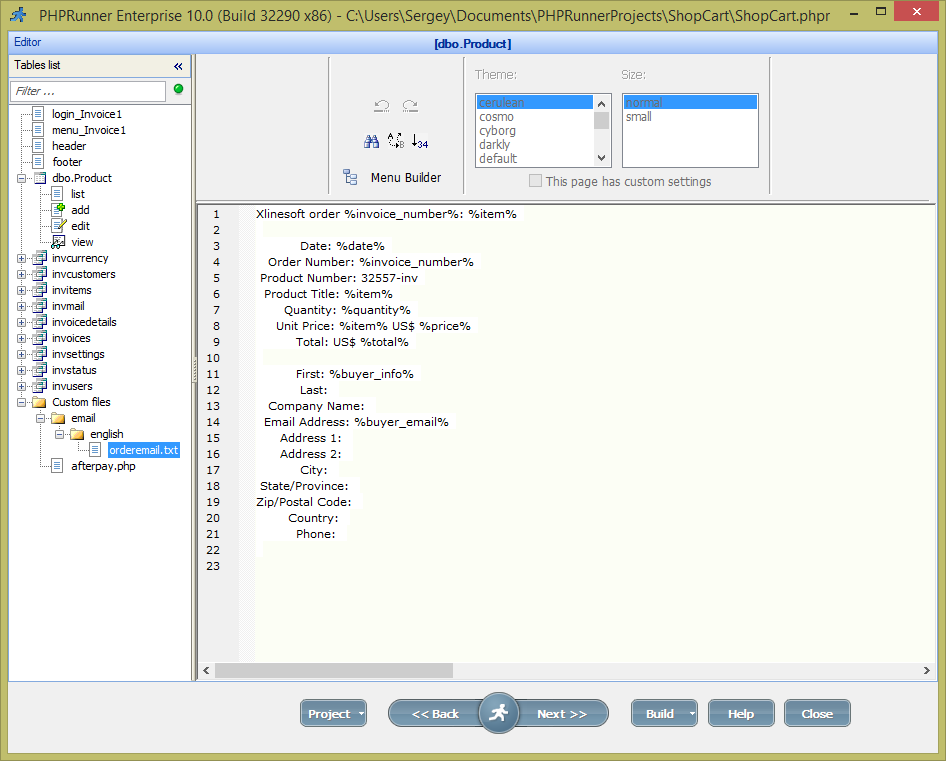
Here is the sample email text you can use. Note the use of %field_name% placeholders.
Xlinesoft order %invoice_number%: %item%

           Date: %date%
   Order Number: %invoice_number%
 Product Number: 32557-inv
  Product Title: %item%
       Quantity: %quantity%
     Unit Price: %item% US$ %price%
          Total: US$ %total%

          First: %buyer_info%
           Last:
   Company Name:
  Email Address: %buyer_email%
      Address 1:
      Address 2:
           City:
 State/Province:
Zip/Postal Code:
        Country:
          Phone:
5. Custom invoice number generation
Many applications require to generate a custom invoice/transaction instead of plain numbers like 1,2,3 etc. You may notice that in our checkout solution Invoice numbers look like INV-X0000365. Here is how it works.
There is an extra table named invnumber that holds the latest order number. We get that number, increment it by one, format it the way we need it and update invoice_number table. Pretty straightforward.
This code can be found under Invoices->Add page->Process record values event.
PHP code
$rs = CustomQuery("select invnumber from invoice_number");
$data = db_fetch_array($rs);
$values['invoice_number'] = "INV-X".str_pad($data["invnumber"]+1, 7, "0",STR_PAD_LEFT);
CustomQuery("update invoice_number set invnumber=invnumber+1");
C# code
dynamic data = XVar.Array(), rs = null;
string numb;
rs = XVar.Clone(CommonFunctions.db_query("select invnumber from invoice_number", GlobalVars.conn));
data = XVar.Clone(CommonFunctions.db_fetch_array((XVar)(rs)));
numb = (data["invnumber"] + 1).ToString();
char s = '0';
values.InitAndSetArrayItem(MVCFunctions.Concat("INV-X", numb.PadLeft(7,s)), "invoice_number");
CommonFunctions.db_query("update invoice_number set invnumber=invnumber+1", GlobalVars.conn);
6. Sending payment receipt (afterpay.php/afterpay.cs)
This is a part of the template and can be edited under Custom Files. Function named runAfterPay will be executed after a successful payment.
Here we update invoice as paid, set invoice payment date and also send the email receipt.
PHP code
<?php
function runAfterPay($hash, $payid, $paytype){
	// $hash - record id for update status field
	// $payid - Payment id from paypal or stripe
	if($hash && $payid){

			// mark invoice as paid
			$sql = "update invoices set status='paid', transaction_id = '".$payid."', paydate='".date("Y-m-d")."' where hash='".$hash."'";
			DB::Exec($sql);

			$email="support@xlinesoft.com";

			// get invoice id based on hash
			$params = array();
			$rs = DB::Query("select * from invoices where hash='".$hash."'");
			if ($data = $rs->fetchAssoc()) {

				$rs2 = DB::Query("select * from invoicedetails where id_invoice=".$data["id"]);
				while( $data2 = $rs2->fetchAssoc() ) 	{
						// send order email, one per item
						$data["price"]=$data2["price"];
						$data["quantity"]=$data2["quantity"];
						$data["item"]=$data2["item"];
						$data["total"]=$data2["total"];
					  RunnerPage::sendEmailByTemplate($email, "orderemail", $data);
				}
			}
			echo "ok";
		}
}
?>
C# code
using System;
using System.IO;
using System.Collections.Generic;
using System.Linq;
using System.Text;
using System.Web;
using System.Web.Mvc;
using System.Reflection;
using runnerDotNet;
namespace runnerDotNet
{
	public partial class GlobalController : BaseController
	{
		public static XVar runAfterPay(dynamic hash, dynamic payid, dynamic paytype)
		{
			if((XVar)(hash)  && (XVar)(payid))
			{
				dynamic data = XVar.Array(), email = null, rs = null, sql = null, var_params = null;
				sql = XVar.Clone(MVCFunctions.Concat("update invoices set status='paid', paydate='", MVCFunctions.date(new XVar("Y-m-d")), "', payid='", payid, "', paytype='", paytype, "' where hash='", hash, "'"));
				DB.Exec((XVar)(sql));
				email = new XVar("support@xlinesoft.com");
				var_params = XVar.Clone(XVar.Array());
				rs = XVar.Clone(DB.Query((XVar)(MVCFunctions.Concat("select * from invoices where hash='", hash, "'"))));
				if(XVar.Pack(data = XVar.Clone(rs.fetchAssoc())))
				{
					dynamic data2 = XVar.Array(), rs2 = null;
					rs2 = XVar.Clone(DB.Query((XVar)(MVCFunctions.Concat("select * from invoicedetails where id_invoice=", data["id"]))));
					while(XVar.Pack(data2 = XVar.Clone(rs2.fetchAssoc())))
					{
						data.InitAndSetArrayItem(data2["price"], "price");
						data.InitAndSetArrayItem(data2["quantity"], "quantity");
						data.InitAndSetArrayItem(data2["item"], "item");
						data.InitAndSetArrayItem(data2["total"], "total");
						RunnerPage.sendEmailByTemplate((XVar)(email), new XVar("orderemail"), (XVar)(data));
					}
				}
				MVCFunctions.Echo("ok");
			}
			return null;
		}
	}
}
Note the use of RunnerPage::sendEmailByTemplate() function. This function accepts the following parameters:
$email - email address to send email to.
"orderemail" - name of email template. Remember orderemail.txt file created on step 4?
$data - array with data to replace placeholders in email template with the actual values.
7. API integration
Now we need to integrate it into our existing website. We provide REST API for this purpose. There are two files that come with Invoice template, apitest.php and apitest.cs that provide sample API usage code.
You will need to change $url variable – URL of Invoice add page on your website. Also you need to specify “your Authenticate key”. This can be any unique text string that you can specify in Invoice project under Settings->API Authorization key.
<?php

//This API allows to create an invoice sending buyer and seller data and also a list of items, prices, taxes etc.
//If invoice is created successfully it returns URL of the View page of this invoice.

require_once("include/dbcommon.php");
$url = "https://yourwebsite.com/invoice/invoices_add.php";
$res["company_name"]="Company Name";
$res["seller_info"]="Seller Info";
$res["buyer_info"] = "buyer name";
$res["buyer_address"] = "buyer address";
$res["buyer_email"] = "buyer@email.com";
$res["tax"]="10";
$res["terms"]="terms";
$res["invoice_name"]="Invoice Name";
$res["details"] = array();
for($i=1;$i<3;$i++){
	$details = array();
	$details["item"] = "item_".$i;
	$details["price"] = $i;
	$details["quantity"] = $i;
	$res["details"][] = $details;
}
$str = json_encode($res);
$parameters["invoice"] = $str;
$headers["WWW-Authenticate"] = "your Authenticate key";
$res = runner_post_request($url, $parameters, $headers);
if($res["error"])
	echo $res["error"];
else {
	if(strpos($res["content"],"http")>-1)
		echo "Invoice view";
	else
		echo $res["content"];
}
?>
Thanks for posting this. This is a most useful application!
Did anyone managed to get this to work?