Add a Delete Button to Each Row in a PHPRunner Grid
ASP.NET, PHP, PHP Code Generator, TutorialsPHPRunner normally provides Delete selected for removing one or more records from a List page. In some applications, it is more convenient to place a Delete action directly on each row next to the standard View, Edit or Copy actions.
This tutorial shows how to add a row-level Delete button, ask for confirmation, delete the correct record and reload the List page afterward.
Before you add the button
Place the custom button inside the grid row. This is important because the button needs access to the current record so the server-side code can determine which row should be deleted.
You will also need to know the table name and the key field used to identify each record. In the example below, the table is categories and the key field is CategoryID. Replace those values with the corresponding names from your project.
Security note: a custom button that calls DB::Delete() does not automatically inherit all of the behavior of PHPRunner’s standard Delete action. Make sure the button is only available to users who are allowed to delete the corresponding records, and add any additional permission checks your application requires.
1. Add the button to the grid
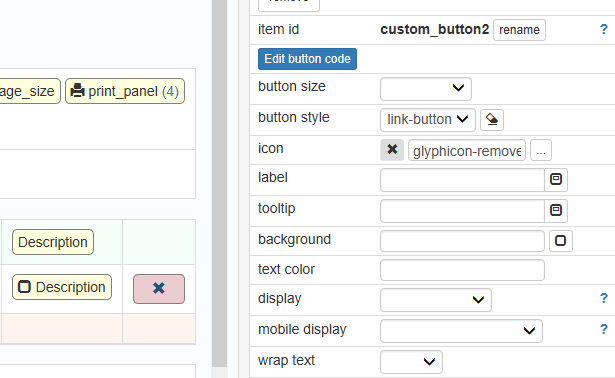
Open the List page in Page Designer and insert a button. Move the button into one of the grid columns so it becomes part of each record row.
Choose a button style that matches the other row actions, such as View or Edit. Select an appropriate delete or trash icon from the icons available in your current PHPRunner version.
2. Ask for confirmation
Open the button code and add the following to the ClientBefore event.
Returning false prevents the server-side part of the button from running when the user cancels the confirmation.
3. Delete the current record
In the Server event, use getCurrentRecord() to get the record associated with the row where the button was clicked.
PHP
The $record array contains the current row data. We copy the key value into $data and pass it to DB::Delete().
Replace categories with your table name and CategoryID with your actual key field.
If your table uses a composite key, include all key fields in the array:
C#
4. Reload the List page
After the server-side delete finishes, reload the page so the removed record disappears from the grid.
Add the following code to the Client After event:
How the button works
The complete flow is simple: the user clicks the Delete button, confirms the action, the button reads the current record, the server deletes that record using its key value, and the browser reloads the List page.
Using getCurrentRecord() is what makes this technique suitable for a button placed inside a grid row. The same button code runs for every row, but PHPRunner provides the data for the specific record where the user clicked.
For straightforward applications, this produces a convenient row-level Delete action without requiring users to select a checkbox first and then use Delete selected.
Can you double-check the C# code? It does not compile for me as written. I tried removing the third line which appears to be a mistake, and changed pageObject.getCurrentRecord(); in the first line to button.getCurrentRecord();. After these changes, the code compiles and no errors are generated upon running it, but the record does not get deleted. I did update the table and PK names.
@Pete,
thank you for pointing! The code was fixed.
If it did not delete then please try changing
DB.Delete(“categories”, data );
to
DB.Delete(“dbo.categories”, data );
If you are using MS SQL
Is there a way to hide this delete button when doing an inline edit (the same way the edit button disappears)?
Thanks,
Tim
@Tim,
this won’t be that easy as you would need to intercept inline edit click. We do not have an API for this.
Can we delete only certain columns/fields from a row using the same method?