Version 10.7 of PHPRunner and ASPRunner.NET is here!
If you purchased PHPRunner or ASPRunner.NET less than 12 months ago, proceed to the control panel and download the registered version 10.7 there under ‘My purchases’. Use ‘Reg info’ link next to your latest purchase.
This new version features the following improvements:
1. Files upload to cloud providers: Google Drive, OneDrive, Amazon S3, Dropbox
2. Notification API
Let’s dig into new functionality.
Files upload to cloud providers
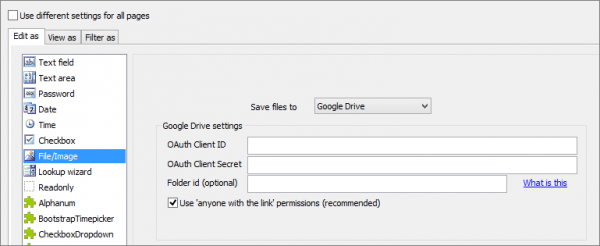
When you set ‘Edit as’ type of the field to File/Image you now have an option to choose one of the cloud storage options.
Google Drive
Refer to this article that explains how to create an app in Google Cloud Console and get OAuth Client ID and OAuth Client Secret. Folder ID is optional. If you do not specify it, files will be uploaded to the root folder.
To find the folder id proceed to that folder in Google Drive in your web browser. The URL may look like this:
https://drive.google.com/drive/u/3/folders/0B-9X707clcqJMmI4OTI4MWEtMDBmNS00OGIwLThiZmYtOWJhMDdiNTc3ZmU3?resourcekey=0-z0sQH4Jjn_-nLn64zuPDvg
Here 0B-9X707clcqJMmI4OTI4MWEtMDBmNS00OGIwLThiZmYtOWJhMDdiNTc3ZmU3 is your folder id.
Make sure to read the Important note below.
Microsoft OneDrive
Create a new app registration
Proceed to Azure -> App registrations -> New registrations
Name:
Supported account types: This parameter can not be changed later.
If you plan to use your personal OneDrive account, choose Personal Accounts only
Redirect URI: – you can change this parameter later
Platform: Web
PHPRunner:
For example
https://my.site/app/oauthcallback.php
or
http://localhost:8086/oauthcallback.php
ASPRunner.NET:
For example
https://my.site/app/oauthcallback
or
http://localhost:8086/oauthcallback
Press Register to create the application.
Configure app registration
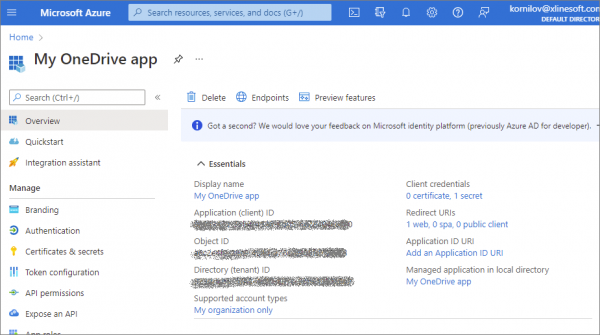
App registrations -> Your app, Proceed to Overview
Application (client) ID – copy to PHPRunner/ASPRunner.NET as Client ID
Proceed to Certificates & secrets, click ‘New client secret’
After the secret is created copy its Value (not the Secret ID!) to the Client Secret field in PHPRunner/ASPRunner.NET
Proceed to API Permissions
Click Microsoft Graph and add permissions.
Use the search tool.
The following permissions need to be added:
offline_access
Files.ReadWrite
Proceed to Authentication
Add the Redirect URL if you didn’t do that before or need to add a new one.
Press Add platform, choose Web.
See above which Redirect URL to enter.
Proceed to OneDrive.
Note the URL in browser’s address box. It should be something like this
https://onedrive.live.com/?id=root&cid=7FD32AC638D2A7
Copy the cid parameter value to Drive field in PHPRunner
For example:
7FD32AC638D2A7
You are all set. Now you can run your application.
Important
This applies to both Google Drive and Microsoft OneDrive. After the project is built and published, open it in the web browser and proceed to any page of a table where cloud storage is used. You will be redirected to Google or Microsoft site to log in.
Log in under the account that should be used to store the files. Then the application will save the credentials, and no further login will be needed.
The credentials are saved in
Amazon S3
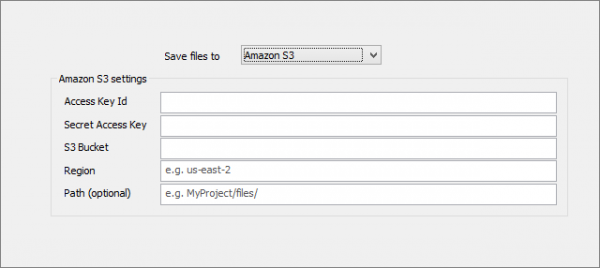
You need to specify Access Key ID, Secret Access Key, S3 Bucket name, Region and optional path.
1. Logon to AWS Console as a root user.
2. In the navigation bar on the upper right, choose your account name or number and then choose My Security Credentials.
3. Expand the Access keys (access key ID and secret access key) section.
4. To create an access key, choose Create New Access Key. If you already have two access keys, this button is disabled and you must delete an access key before you can create a new one. When prompted, choose either Show Access Key or Download Key File. This is your only opportunity to save your secret access key. After you’ve saved your secret access key in a secure location, choose Close.
5. Go back to the account home page, select S3 from the list of Services. Create a new bucket or select an existing one. This is where you can see the Bucket Name and Region.
6. Important: in bucket properties, under Permissions, scroll down to Cross-origin resource sharing (CORS) and paste the following JSON there. It is required for Amazon S3 Javascript library to work.
[
    {
        "AllowedHeaders": [
            "*"
        ],
        "AllowedMethods": [
            "HEAD",
            "GET",
            "PUT",
            "POST",
            "DELETE"
        ],
        "AllowedOrigins": [
            "*"
        ],
        "ExposeHeaders": [
            "ETag"
        ]
    }
]
Notification API
To enable Notification API, proceed to Miscellaneous screen, click ‘Notification API’ button, enable this feature and create a new table to store notifications. Now, since this is an API, we need to write some code to make it work. Let’s start with something simple. When someone adds a new record to the Categories table we also want to create a notification.
For this purpose, we will add the following code to the Categories table AfterAdd event:
PHP
addNotification( "New category added: ".$values["CategoryName"] , "New category", "fa-envelope", makePageLink( "categories", "view", $keys) );
C#
CommonFunctions.addNotification( "New category added: " + values["CategoryName"].ToString() , "New category", "fa-envelope", makePageLink( "categories", "view", keys) );
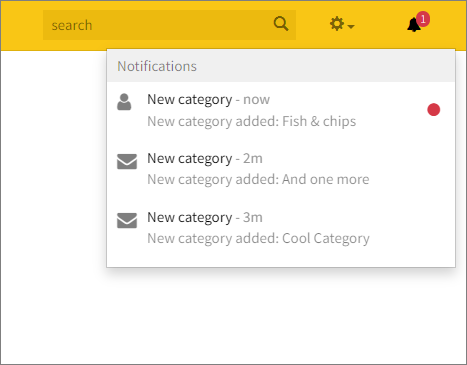
If everything worked as expected, we will see a new notification added after each new record in the Categories table. And if we click on any notification, it will take us to that new Category view page.
Let’s take a closer look at this function’s parameters.
PHP
function addNotification( $message, $title = null, $icon = null, $url = null, $expire = null, $user = null, $provider = null )
C#
function CommonFunctions.addNotification(dynamic _param_message, dynamic _param_title = null, dynamic _param_icon = null, dynamic _param_url = null, dynamic _param_expire = null, dynamic _param_user = null, dynamic _param_provider = null)
Parameters:
$message – notification text
$title – optional notification title
$icon – optional icon, can be in one of three formats:
URL – “https://website.com/path/image.png” or “images/file.gif”
Bootstrap icon: “glyphicon-film”, “glyphicon-hand-right”
The full list of available Bootstrap icons.
Font Awesome icon: “fa-envelope”, “fa-user”
The full list of available Font Awesome icons.
$url – optional URL. When specified, a click on notification sends the user to the specified address. See makePageLink function
$expire – optional expiration date and time for the message. Can be either datetime in “YYYY-MM-DD hh:mm:ss” format, or a number of minutes the notification should be visible. After the expiration date/time the notification will be deleted from the notifications table.
Examples:
“2022-01-10 00:00:00” or 1440 for 24-hour period
$user – username the message should be visible to. If not specified, all users and guests will see the notification.
$provider – when $user is a database user, whose username and password are stored in a database table, this parameter must be empty. When the user is from Active Directory, OpenID, Google etc, then put the two-letter security provider code here. You can find it on the ‘Security screen’ under the provider settings dialog.
Alternative syntax
PHP
function createNotification( $params )
C#
function CommonFunctions.createNotification( dynamic params )
$params – array of notification parameters
$params[“message”] – corresponds to $message parameter in addMessage()
$params[“title”] – notification title
$params[“icon”] – icon
$params[“url”] – URL
$params[“expire”] – expiration datetime or time in minutes
$params[“user”] – user
$params[“provider”] – security provider
Creating a link to an application page
You can use a helper function makePageLink to quickly create links to any application page.
PHP
function makePageLink( $table, $pageType, $keys = null, $additionalParams = array() )
C#
function makePageLink(dynamic table, dynamic pageType, dynamic keys = null, dynamic additionalParams = null)
Parameters:
$table – name of the table the page belongs to. Specify empty string for pages like login, menu etc.
$page – page type like “list”, “add”, “edit”
$keys – when creating a link to edit or view page, specify record keys here. This can be either simple array of values, like
array( 10, “JOHN”)
or associative array with field names as keys:
array( “department” => 10, “last_name” => “JOHN”)
When used in ‘After record updated’ or ‘After record added’ event, pass the $keys parameter of the event as is.
$additionalParams – any additional params you want to add to the URL.
array( “page” => “list1” ) will create a URL to the additional list page named “list1”
Examples:
PHP
makePageLink( "cars", "list", null, array( "page" => "list1" ))
C#
CommonFunctions.makePageLink( "cars", "list", null, new XVar("page", "list1"))
The code above will produce a link “cars_list.php?page=list1”, which points to the additional List page called list1.
PHP
makePageLink( "cars", "view", $keys )
C#
CommonFunctions.makePageLink( "cars", "view", keys )
When called from the ‘After Record Added’ event returns a link to the View page of the newly added record.
Enjoy!


We were waiting for this improve add notifications and new features around the dashboards, thanks
Will the stripe payment gateway integration still be part of the launch for 10.7?
From one version to another, there are new and important features and tools…
excellent
Wow very cool! I was able to quickly get the notifications working on a demo project.
Few Suggestions:
1. Can we also add the user groups parameter? For example, we only want to send notifications to the Sales Team or Customer Service agents only. I understand we can separate by specific user but this extra field can be useful as well.
2. Dismiss Notification. Option to dismiss notification. Add a boolean field in table true/false. In the chance that the notification is like a task. For example, a website lead being sent to the sales team. Someone marking the notification as archived means it’s been taken care of and it won’t show in any other persons notification tray
3. Sound options (bells and dings)
4. Snooze. Remind again in X minutes
5. Change browser title. “My project (24)” to show 24 unread notifications
6. Expand notifications. Click on a link in the notification tray to open list page of notification events in detail.
7. The user thumbnail displayed showing who created the notification.
Great features have arrived, thank you for your efforts, we are happy to follow you and use phprunner.
Work good
cuando sale la version oficial 7
The notification are only visible if I open the website project ,right ?
Everybody is using cell phones these days
Would it not be nice to integrate additional google firebase notifications to receive notifications
on your cellphone. Sure you can use emails but notifications are faster for short messages
and quick if you embed a link into the notifaction.
Dont get me wrong. The firebase stuff can be used with some programmingm but it would be a nice
feature like “google drive” to integrate in phprunner.
rg
J.
+1 (groups are more suitable than users to assign the notifications properly)
#Can we also add the user groups parameter? For example, we only want to send notifications to the #Sales Team or Customer Service agents only. I understand we can separate by specific user but this #extra field can be useful as well.
Parabéns pelo ótimo trabalho, cada vez mais melhorando o que já era muito bom!
Perfect timing. I was actually about to start working on a project that needed the ability to upload to cloud providers. This makes it so much easier.