Version 10.4 is here!
This update is free of charge for those who purchased or upgraded less than one year ago. To find new version download links and registration keys proceed to the control panel and find it under ‘My purchases’. There will be a ‘Reg info’ link next to your latest purchase.
The two most important features in this update are our own REST API and also the consumption of data, provided by third-party APIs. Consumption of third party data turned out to be the most difficult task and took more time than we expected, hence the delay. On the plus side, we now able to work with any data, not just something that comes as a result of the SQL query. And this also helped us implement a few minor but frequently requested features like OR search or data filtering in charts.
REST API consumption
REST Views
Data received from REST API providers like Spotify or Football API. In this article we will show you how to display the list of English Premiere League matches using Footbal API.
1. Add REST API connection and REST View
Here is how REST API connection setup looks like.
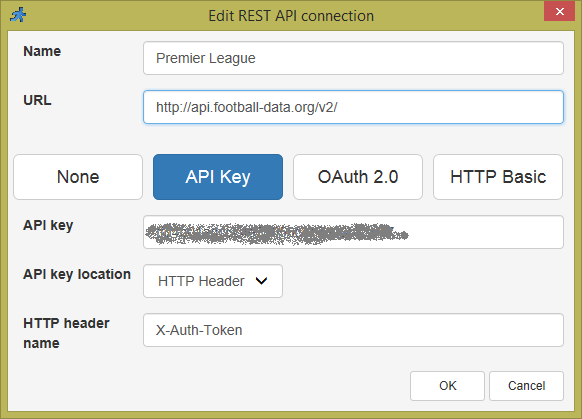
Both the base API URL and authorization method are provided by the REST API provider. What kinds of views to create – depends on the API itself. For instance, Football API offer the following “resources”: competitions, matches, teams, standings, and players. It is natural to create the same REST Views in your project. In this specific project, we are creating Matches and Teams views.
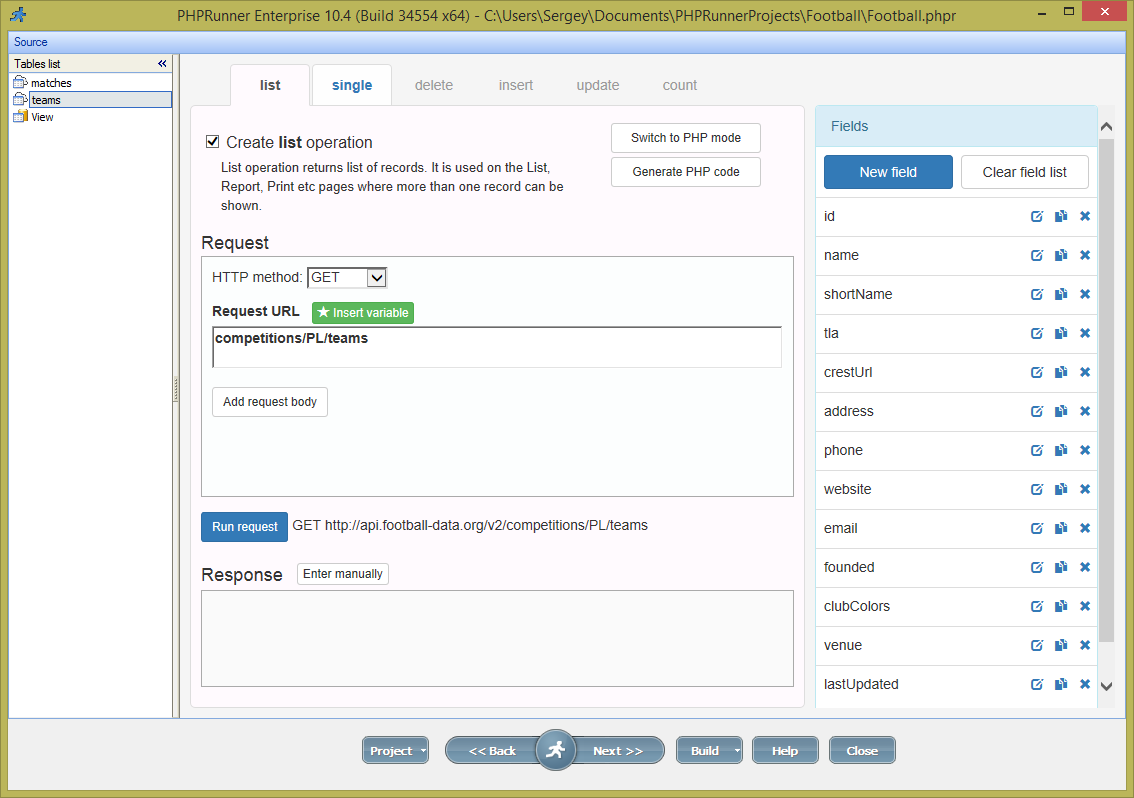
2. Configure URL, execute the List request, add fields
REST View setup, List operation.
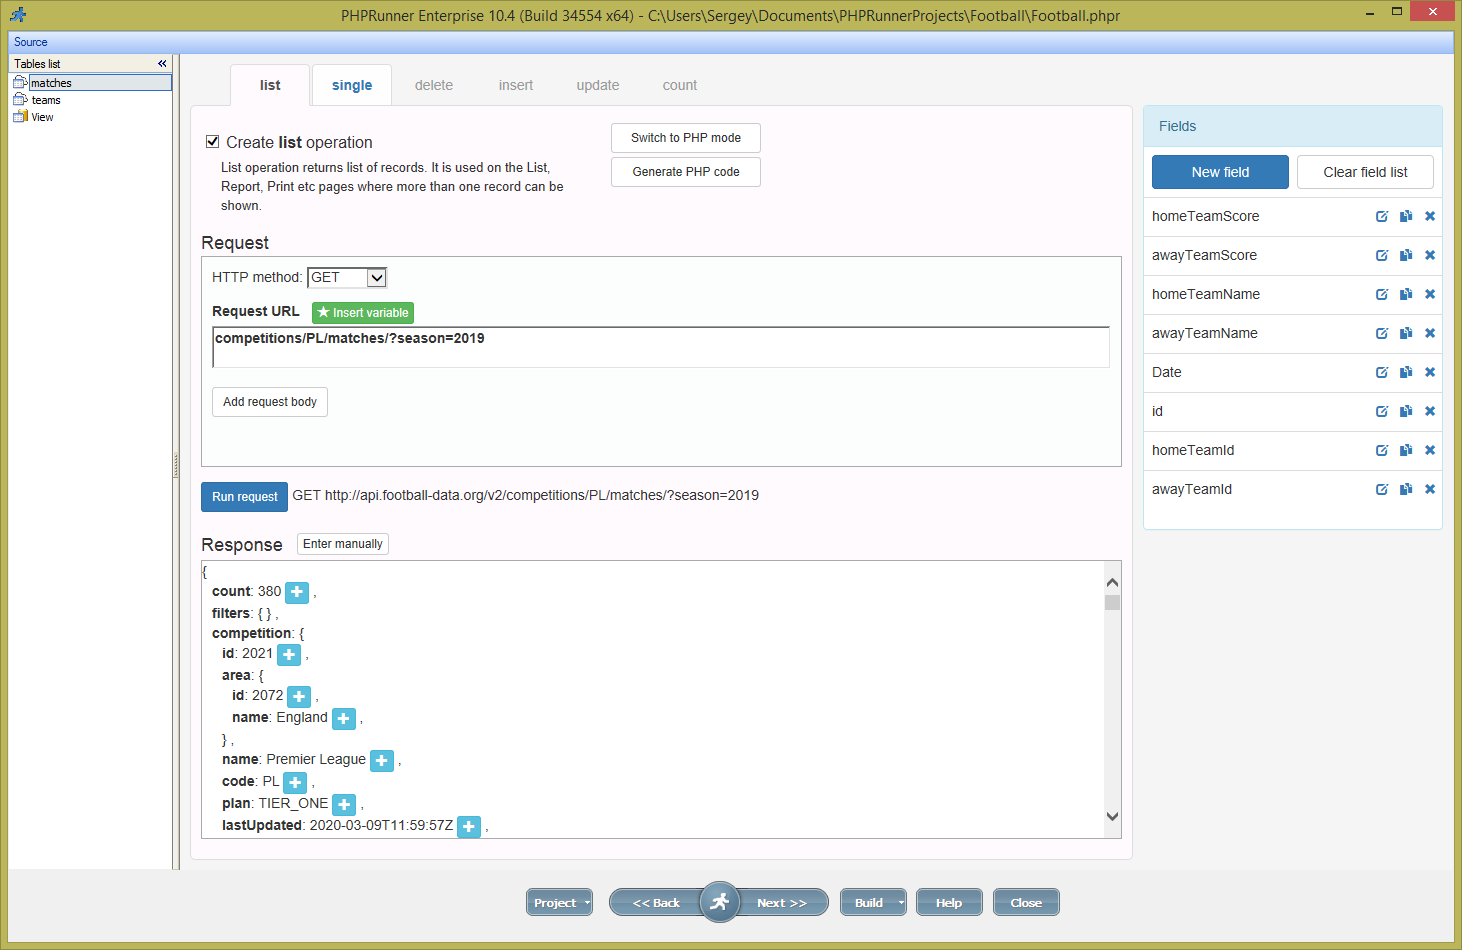
You can see that in this view we limit it to season 2019 of the Premier League. This is where we found some sample requests.
You enter the Request URL, it gets added to the base REST API URL and shows the actual request being performed. If your URL is correct, run the request and get the response back in JSON format. You can see it in the Response area. Retrieving and parsing the response may take a bit of time, depending on the API. You can also copy and paste the sample JSON response from the
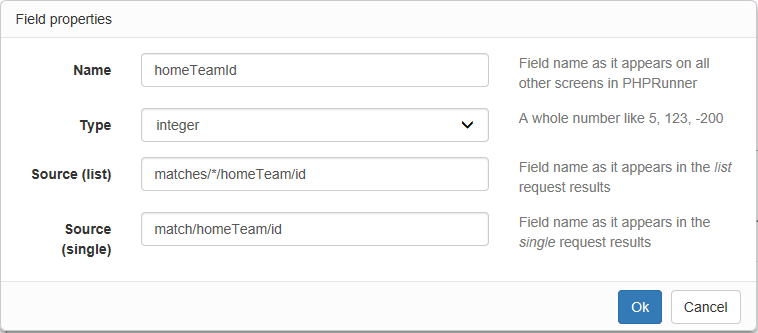
Now there is time to add fields. The easiest option is to use a plus button in the Response area. Make sure you are finding the correct field in the response. For instance, in this response, there is also competition info, season info, venue, referees etc. Again, it all depends on the specific API. Once we found and added our fields we also need to assign meaningful names to them. There might be several fields named ID, Name. We’d rather deal with names like homeTeamName, awayTeamName etc.
Here is how the field settings are going to look at this moment. Your job is to assign it a meaningful name and make sure that the correct data type is selected.
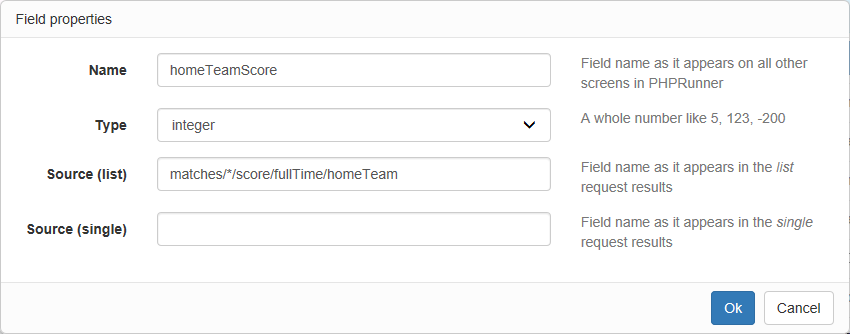
* in Source(list) means a list of items, for instance, matches/*/score/fullTime/homeTeam means a list of matches where * will be replaced with real IDs like 1, 2, 3 etc. You don’t need to worry about the syntax as our software handles this for you.
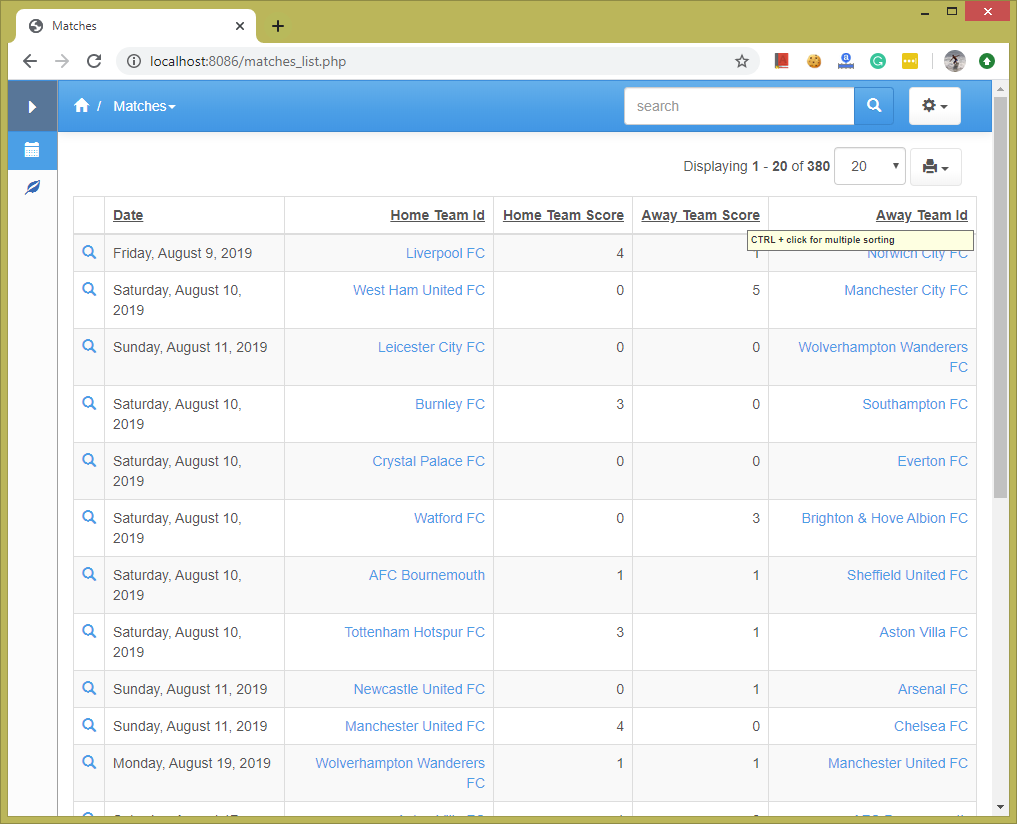
Now you can build your project, run it and you will see the list of English Premier Leagues from season 2019 on your screen. Isn’t it cool? This is your first REST API View and it works!
Now you can choose what fields to show on the List page and in which order, choose what fields to make searchable, what ‘View as’ format to use etc. In other words – the rest of the software works exactly the same way as at did with data coming from the database.
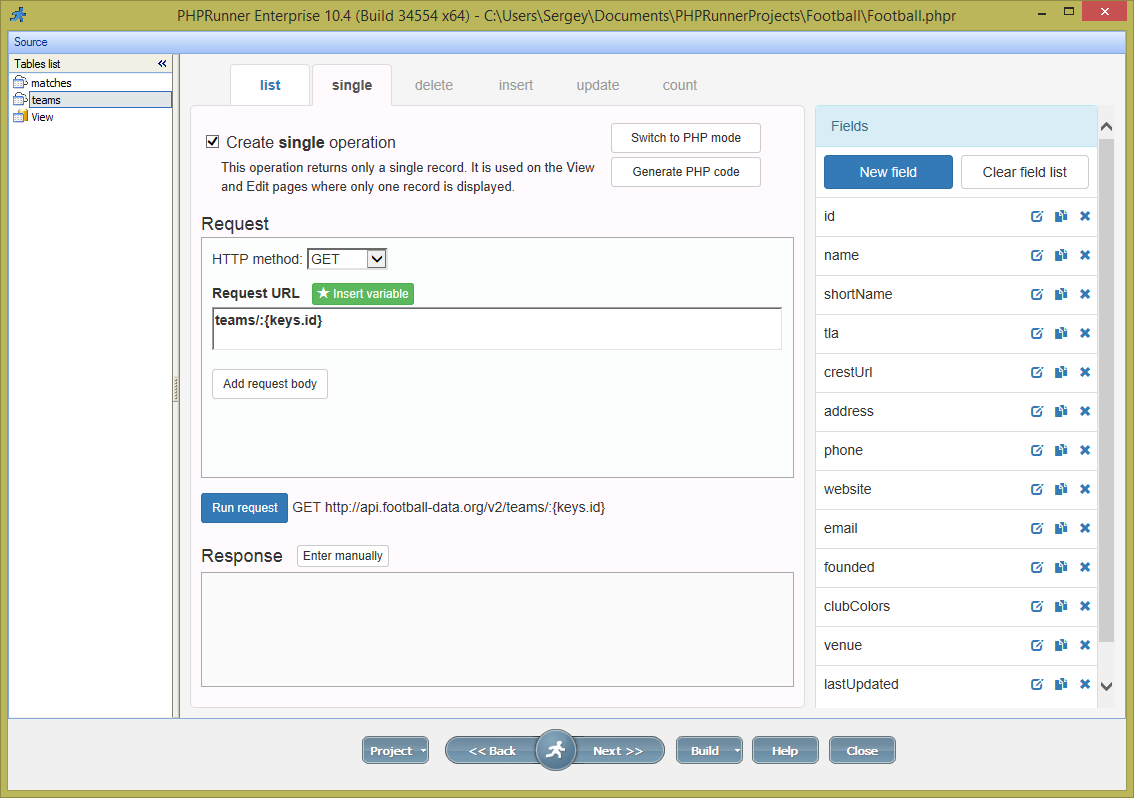
3. Configure URL for the Single operation, execute, add fields
Next step – let’s create a Single operation, which is basically a view page. Proceed to the Pages screen and choose id as a key column. Again, this name depends on the API you use and may be different in your case.
Go back to REST View setup screen and enable Single operation. From the REST API docs we can see that a single match request looks like this: https://api.football-data.org/v2/matches/xxxxxx where xxxxxx is our match id, received via List operation. So, into the Request URL field we enter matches/ and then use ‘Insert variable’ to select keys.id variable.
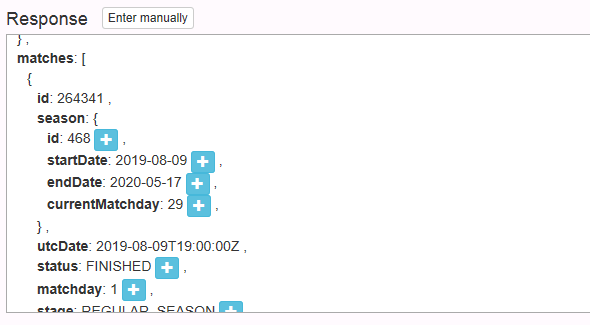
Now we can run this request. Since we use a parameter there the software will ask you to provide one. We can go back to the List operation screen and copy match id (264341) from there.
Now you do the same thing – add fields from the Single operation response. If REST API is well designed and fields named in a similar manner then it will simply populate Source (single) part of the field properties.
In some cases, the software won’t recognize that the field was created already and will add a new one like id1, id2 etc. In this case, proceed to id1 field properties, copy Source (single) path and paste to id field Source (single) part. After that id1 field can be safely deleted.
Once you do this for all fields you need to appear on the Single (View) page, proceed to the ‘Pages’ screen, enable ‘View’ page and build your project. You can now access the View page from the List page.
4. Creating Teams view and linking it from Matches view
Let’s create a similar REST View for the Teams. I will just show screenshots of how List and Single operations should look.
List operation:
Single operation:
You can add Team fields the same way as described in the Matches View section. Now let’s go back to Matches List View and make sure that both Home Team ID and Away Team ID appear on the List view.
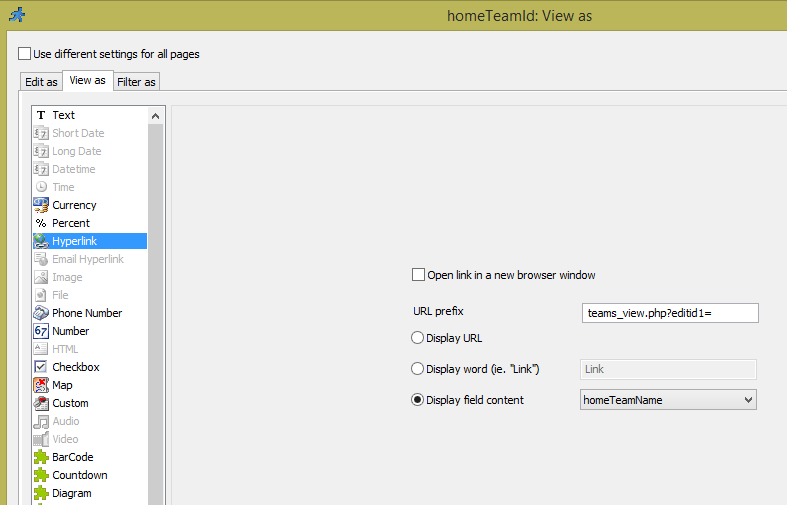
Proceed to homeTeamID ‘View as’ settings and configure it as a link that points to the corresponding Teams View page.
This is pretty much it for now. Now if you build your app and run it in the web browser you will see something like this.
5. Other REST View operations
Since this API only provides the read-only access to data we won’t need insert, update or delete operations. We will come with examples of using these operations later. The count operation is only required when REST API provides pagination option.
SQL Views
The new functionality offers a lot more than just data received via REST API.
You can now use any non-standard SQL Query to retrieve data i.e. you can use MySQL variables in your SQL Query or use stored procedures to retrieve data. Let’s see how to work with stored procedures. In this example, we will work with MySQL and Northwind database.
First, let’s create a stored procedure:
DELIMITER //
CREATE PROCEDURE categories_search
(IN a VARCHAR(50))
BEGIN
  SELECT * from categories
  where Description like concat('%', a, '%');
END //
DELIMITER ;
It doesn’t do much but returns a list of categories that contain the word passed there as a parameter. We can test in in phpMyAdmin this way:
call categories_search('fish')
Once we made sure that stored procedure works we can create a SQL View based on this stored procedure call. We will use ‘All fields search’ variable as a parameter. Note that we added single quotes around the parameter since this is a text variable. And, of course, we didn’t have to remember this variable name, we added it via Insert variable->All fields search.
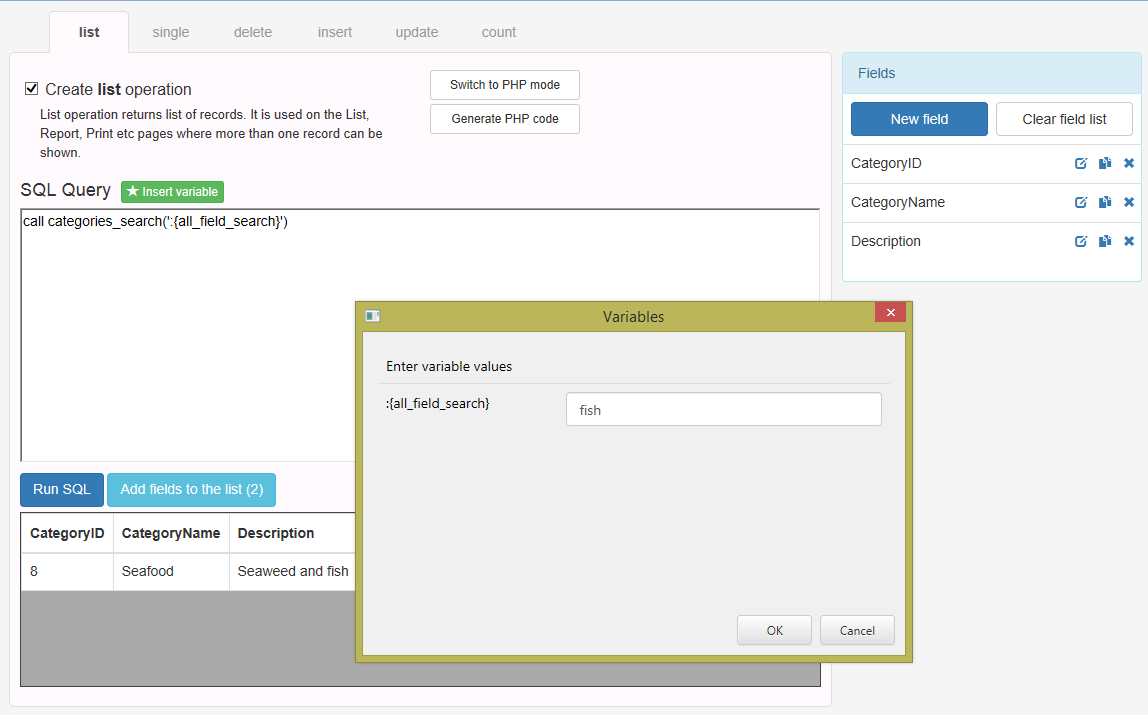
Now we can run this procedure, get results back, add fields to the list and proceed to build the project.
Note: ‘All fields search’ parameter will be empty on the initial page load. You need to make sure that your stored procedure won’t break if an empty parameter is passed there. This is, of course, not a problem, if your stored procedure doesn’t take any parameters.
Any PHP or C# code
For instance, you can display a list of files from the file system. Handy, if you need to implement a file manager. PHPRunner and ASPRunner.NET will build the sample code for you and you can extend it any way you need it. Here is an example of just supplying some data as an array:
$data = array();
$data[] = array("id"=>1, "name"=>"aaa");
$data[] = array("id"=>2, "name"=>"bbb");
$data[] = array("id"=>3, "name"=>"ccc");
$result = new ArrayResult( $data );

if( !$result ) {
	$dataSource->setError( DB::LastError() );
	return false;
}
// filter results, apply search, security & other filters
$result = $dataSource->filterResult( $result, $command->filter );
// reorder results as requested
$dataSource->reorderResult( $command, $result );
return $result;
You will also need to define two fields, id (integer) and name (varchar). This is it, you can build your app and all functions like search, filters, pagination will work out of the box. If you ever needed to build pages that are not tied to any database table – your prayers were answered. You can use Code Views, for instance, to build a feedback form where data entered by the user is sent to your email.
REST API
As a first step enable REST for your project under Miscellaneous->REST API.
REST API Events
Since REST API interaction is fully UI-less, not all events make sense. Here is the list of events that will be executed for requests made via REST API:
- AfterAppInitialized
- AfterTableInitialized
- BeforeAdd/AfterAdd
- BeforeEdit/AfterEdit
- BeforeDelete
- After record deleted
REST API Authorization
Skip this section if your project doesn’t have the login page enabled.
REST API considerations
URLs
URLs and URL parameters should be URL encoded. For instance instead of “order details” you need to use “order%20details”.
This is correct:
curl "http://localhost:8086/api/v1.php?table=order%20details&action=view&editid1=10248&editid2=42"
In this is not:
curl "http://localhost:8086/api/v1.php?table=order details&action=view&editid1=10248&editid2=42"
And response will be:
{
error: "Unknown table name",
success: false
}
List of fields
For now, all fields that appear in the SQL query will be returned in case of list/view or updated in case of update/insert. Later we will have an additional option to choose fields that are updatable or selectable via REST API.
Files upload
Not supported for now
Advanced Security
If Advanced Security mode like “Users can see and edit their own data only” is enabled in the wizard it will be also applied to the REST API requests.
Search and pagination
Support of search and results pagination will be added in the final version.
REST API Code Examples
list
Returns a list of records.
Sample request URL:
curl "http://localhost:8086/api/v1.php?table=customers&action=list"
Sample response:
{
  "data": [
    {
      "CustomerID": "ANATR",
      "CompanyName": "",
      "ContactName": "Morris H Deutsch",
      "ContactTitle": "",
      "Address": "8799 Knollwood dr",
      "City": "Eden Prairie",
      "Region": "MN",
      "PostalCode": "55347",
      "Country": "United States",
      "Phone": "2027280820",
      "Fax": "(5) 555-3745",
      "Lat": "44.8436452000",
      "Lng": "-93.4535225000"
    },
    {
      "CustomerID": "ANTON",
      "CompanyName": "Antonio Moreno Taqueria",
      "ContactName": "Antonio Moreno",
      "ContactTitle": "Owner",
      "Address": "Mataderos 2312",
      "City": "Mexico",
      "Region": "",
      "PostalCode": "33333",
      "Country": "Mexico",
      "Phone": "(5) 555-3932",
      "Fax": "",
      "Lat": "32.5053534000",
      "Lng": "-117.0668113000"
    }
],
  "success": true

}
Sample PHP code
This code connects to the REST API, retrieves all customers’ data and displays results.
<?php

  $url = "http://localhost:8086/api/v1.php?table=customers&action=list";

  $session = curl_init();

  curl_setopt($session, CURLOPT_URL, $url);
  curl_setopt($session, CURLOPT_HTTPGET, 1);
  curl_setopt($session, CURLOPT_HEADER, false);
  curl_setopt($session, CURLOPT_HTTPHEADER, array('Accept: application/xml', 'Content-Type: application/xml'));
  curl_setopt($session, CURLOPT_RETURNTRANSFER, true);

  if(ereg("^(https)",$url)) curl_setopt($session,CURLOPT_SSL_VERIFYPEER,false);

  $response = curl_exec($session);
  curl_close($session);

  print_r($response);
?>
view
Sample request URL:
curl "http://localhost:8086/api/v1.php?table=customers&action=view&editid1=WOLZA"
Sample request URL with multiple key columns:
curl "http://localhost:8086/api/v1.php?table=order%20details&action=view&editid1=10248&editid2=42"
Sample response:
{
data: {
CustomerID: "WOLZA",
CompanyName: "Wolski Zajazd",
ContactName: "Zbyszek Piestrzeniewicz",
ContactTitle: "Owner",
Address: "ul. Filtrowa 68",
City: "Warszawa",
Region: "",
PostalCode: "1",
Country: "Poland",
Phone: "(26) 642-7012",
Fax: "(26) 642-7012",
Lat: "52.2195630000",
Lng: "20.9858780000"
},
success: true
}
Sample PHP code:
<?php

  $url = "http://localhost:8088/api/v1.php?table=customers&action=view&editid1=WOLZA";

  $session = curl_init();

  curl_setopt($session, CURLOPT_URL, $url);
  curl_setopt($session, CURLOPT_HTTPGET, 1);
  curl_setopt($session, CURLOPT_HEADER, false);
  //curl_setopt($session, CURLOPT_HTTPHEADER, array('Accept: application/xml', 'Content-Type: application/xml'));
  curl_setopt($session, CURLOPT_RETURNTRANSFER, true);

  if(ereg("^(https)",$url)) curl_setopt($session,CURLOPT_SSL_VERIFYPEER,false);

  $response = curl_exec($session);
  curl_close($session);

  print_r($response);
?>
update
Data is passed in the form urlencoded format as fieldname=value&fieldname1=value1 list.
Example:
Update customer with CustomerID (key column) KOENE setting ContactName to be Bill Gates.
curl -X POST "http://localhost:8086/api/v1.php?table=customers&action=update" -d "editid1=KOENE&ContactName=Bill Gates" -H "Content-Type: application/x-www-form-urlencoded"
Sample success response:
{
  "success": true
}
Sample PHP code:
<?php

  $url = "http://localhost:8088/api/v1.php?table=customers&action=update";


  $fields = array(
	'editid1' => "KOENE",
	'ContactName' => "Bill Gates"
);

//url-ify the data for the POST
foreach($fields as $key=>$value) { $fields_string .= $key.'='.$value.'&'; }
rtrim($fields_string, '&');

  $session = curl_init();

  curl_setopt($session, CURLOPT_URL, $url);
  curl_setopt($session,CURLOPT_POST, count($fields));
  curl_setopt($session,CURLOPT_POSTFIELDS, $fields_string);
  curl_setopt($session, CURLOPT_HEADER, false);
  curl_setopt($session, CURLOPT_RETURNTRANSFER, true);

  if(ereg("^(https)",$url)) curl_setopt($session,CURLOPT_SSL_VERIFYPEER,false);

  $response = curl_exec($session);
  curl_close($session);

  print_r($response);
?>
insert
Similar to update except you do not need to supply editid1 parameter.
Example:
Add a category named Beer with Description Beer and stuff.
curl -X POST "http://localhost:8086/api/v1.php?table=categories&action=insert" -d "CategoryName=Beer&Description=Beer and stuff" -H "Content-Type: application/x-www-form-urlencoded"
And response will contain the whole new record including the autoincrement column:
{
   "success":true,
   "data":{
      "CategoryName":"Beer",
      "Description":"Beer and stuff",
      "CategoryID":272
   }
}
Sample PHP code:
<?php

  $url = "http://localhost:8088/api/v1.php?table=categories&action=insert";


  $fields = array(
	'CategoryName' => "Beer",
	'Description' => "Beer and Stuff"
);

//url-ify the data for the POST
foreach($fields as $key=>$value) { $fields_string .= $key.'='.$value.'&'; }
rtrim($fields_string, '&');

  $session = curl_init();

  curl_setopt($session, CURLOPT_URL, $url);
  curl_setopt($session,CURLOPT_POST, count($fields));
  curl_setopt($session,CURLOPT_POSTFIELDS, $fields_string);
  curl_setopt($session, CURLOPT_HEADER, false);
  curl_setopt($session, CURLOPT_RETURNTRANSFER, true);

  if(ereg("^(https)",$url)) curl_setopt($session,CURLOPT_SSL_VERIFYPEER,false);

  $response = curl_exec($session);
  curl_close($session);

  print_r($response);
?>
delete
Sample request URL:
curl -X POST "http://localhost:8086/api/v1.php?table=customers&action=delete&editid1=WOLZA"
Sample request URL with multiple key columns:
curl "http://localhost:8086/api/v1.php?table=order%20details&action=delete&editid1=10248&editid2=42"
Sample PHP code:
<?php

  $url = "http://localhost:8088/api/v1.php?table=categories&action=delete&editid1=273";

  $session = curl_init();

  curl_setopt($session, CURLOPT_URL, $url);
  curl_setopt($session, CURLOPT_HEADER, false);
  curl_setopt($session, CURLOPT_RETURNTRANSFER, true);

  if(ereg("^(https)",$url)) curl_setopt($session,CURLOPT_SSL_VERIFYPEER,false);

  $response = curl_exec($session);
  curl_close($session);

  print_r($response);
?>
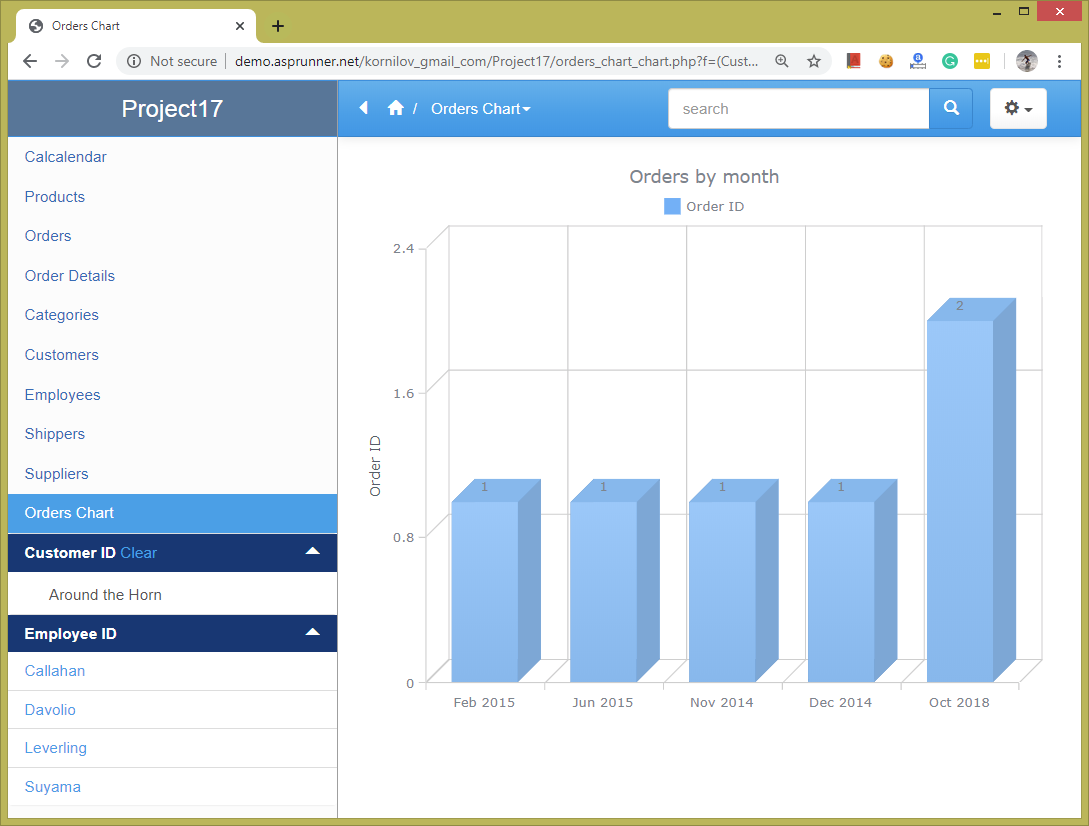
Grouping in Charts
Previously in charts, you had to use GROUP BY in SQL query to display aggregated data like the number of orders per month. Many people were struggling with SQL queries like this and also you could not search or filter that data because of the use of the GROUP BY.
Now we added a much easier option for this. You can just leave the default SELECT * FROM … query and on chart setup screen choose the group field. Here is how it looks in the generated application:
There is an excellent video tutorial on YouTube that covers grouping in charts.
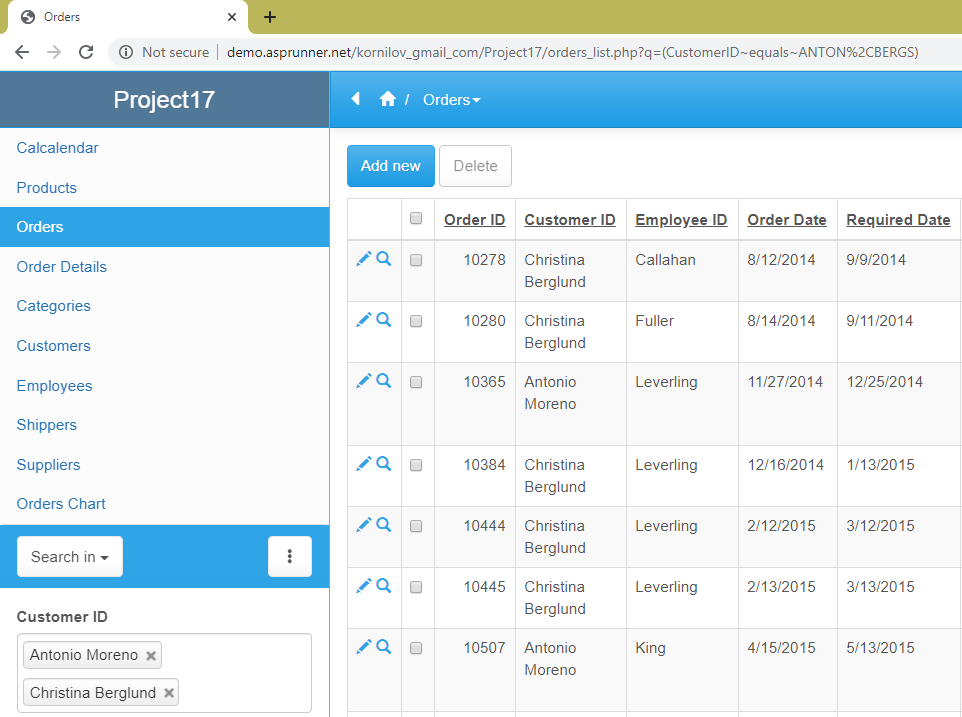
“OR” search
Also, a feature that was not available previously. Previously you had to add the same field twice or thrice to the search panel in order to implement the OR search. Now all you have to do is to make the search field a lookup wizard and enable multi-select on the search page. Now you can easily display orders that belong either to Customer 1 or to Customer 2 or to Customer 3. Configure CustomerID as a Lookup wizard, choose ‘Different settings on each page’ option, make it multi-select on the Search page, leave it Single select on Add/Edit pages.
Here is the video that explains how to configure OR search in version 10.4.
Wow, looks like you guys have been really busy. This is so exciting. Xlinesoft is going to the next level!! Thanks so much for your continued efforts making your software so powerful.
I am hoping to send multiple parameters from my data acquisition system to phprunner and store in a database. While it looks like it can be done with fieldname=value the string will get quite large. It would be nicer to forward a json formatted with all variables. And let phprunner code parse and validate the json. Is this possible? I know it can return a json but can I send it?
My values will include date, time, batch, lot, and 12 other values.
Is there a better way to do this? Thanks!
These are features that I have been hoping for so long to have access to. Thanks and it looks fantastic!
@Stephen,
15 field values doesn’t really sound like a lot. I don’t really see any problems just using the INSERT REST API request.
What about SOAP?
I think adding new templates based on bootstrap 4 or new templates in general will make phprunner great again please consider that
Thanks!
Congratulations, a huge step forward.
Was Multiple database connections a bug that was removed in the new version 10.4?!
This feature (multiple database connections) is available in the Enterprise Edition of PHPRunner.
Good day,
your program is the best i have ever seen. PHP and ASP.net are just beautiful. I don’t consider myself a programmer. I solve the DNN platform for my company, where we sometimes program a module, but the development of such a module is expensive. I discovered only one similar Code on time application on the market, which way it can connect to DNN. If your software could export for DNN (Dotnetnuke) it would be exclusive.
Thank you.
Translated by Google translate.
Will be nice to forward a json with multiple fields to a table(insert & update), I have a table that has 79 fields, most of them are datetimes, varchar2, numbers and json field type..
Hello,
I am using a few days the program and I would like to ask if we could post xml data as soap action.