Quick jump |
The Dialog API displays a dialog to the user and sends user-provided data to the Server event.
The dialog contains a title, text, input controls, OK and Cancel buttons. If the user clicks OK, the Server part of the event is called with the user-entered data passed to it. If the user clicks Cancel, the dialog closes, and nothing else happens.
This function is best suited for the Client Before section of the Custom button event or an AJAX code snippet.
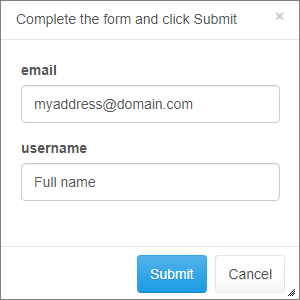
Here is how a Dialog popup looks like:
Note: when you use the Dialog API in the Client Before event, you should always return false. Add this line to the end of your event code:
return false;
Alternatively, you can return the ctrl.dialog call itself, as it always returns false:
return ctrl.dialog( {... } );
Calling Dialog API from the custom button or from AJAX code snippet
ctrl.dialog({settings})
Calling from any other Javascript event
Runner.Dialog( params )
title {string}
sets the dialog title.
header {string}
sets the text displayed on the dialog above input controls.
ok {string}
the label for the OK button. 'OK' by default. If an empty string is provided, the OK button is not displayed.
cancel {string}
the label for the Cancel button. 'Cancel' by default. If an empty string is provided, the Cancel button is not displayed.
fields {array}
sets an array of input fields and their descriptions.
bottom {string}
sets the text displayed on the dialog below input controls.
beforeOK {function(popup, controls) }
This function will be called on the user's click on the OK button. See Example 2.
beforeCancel {function(popup, controls)}
This function will be called on the user's click on the Cancel button.
afterCreate {function(popup, controls)}
This function will be called after the dialog window is created.
Usage
In the description below settings is the dialog settings object.
The field description can be a simple string, for example, 'email'. In this case, a text field with a label email is displayed. This input field is initially empty, and in the Server part of the event, its value is stored in the parameters["email"] variable.
Here is an example of a settings.fields parameter with a basic description:
settings.fields = ['email', 'subject'];
An extended field description is an object with the following properties:
name {string}
the name of the variable in the Server event.
label {string}
the label of the field in the dialog.
type {string}
the type of an input control. Here is the list of supported types:
text |
Regular text field |
textarea |
Textarea control |
date |
Dropdowns with year, month and day |
date-text |
Text field to input the date |
datetime |
Text field to input date and time |
time |
Text field to input time |
checkbox |
Checkbox. setValue() - null or 0 will be interpreted as unchecked, everything else - checked. getStringValue() will return '1' when checked, '' when unchecked.
|
lookup |
Dropdown box with the list of values |
radio |
Set of radio-buttons |
value {string}
the initial value of the field control.
datepicker {boolean}
true or false. Displays the datepicker next to the date field. Applies to the following field types: date, date-text, datetime.
required {boolean}
true or false. Field will be required if true.
omitSeconds {boolean}
true or false. Applies to type time. Time picker will not display seconds if true.
horizontal {boolean}
true or false. Applies to type radio. Radio buttons displayed horizontal when true.
Here is an example of a settings.fields parameter with both basic and extended descriptions:
settings.fields = [
'email', // basic description
// extended description:
{
name: 'body',
label: 'Message body',
type: 'textarea',
value: 'Hello,\n'
}];
Parameters of beforeOK, beforeCancel, afetrCreate functions
popup
Popup object
controls
an array of input controls with the following functionality. controls[0] represents the first input control, controls[1] represents the second input control etc. In the list below n is a control index number, starting with zero.
controls[n] |
jQuery object representing input control |
controls[n].val() |
Get value of input control |
controls[n].getStringValue() |
Get value of control formatted the way it will be sent to the database. datetime field: 2020-01-05 20:31:11 time field: 20:31:11
|
controls[n].getDateValue() |
Get value of date or datetime control. Returns Javasript Date object. |
controls[n].setValue() |
Set value of input control. For date/datetime controls accepts both strings and Javascript Date objects. |
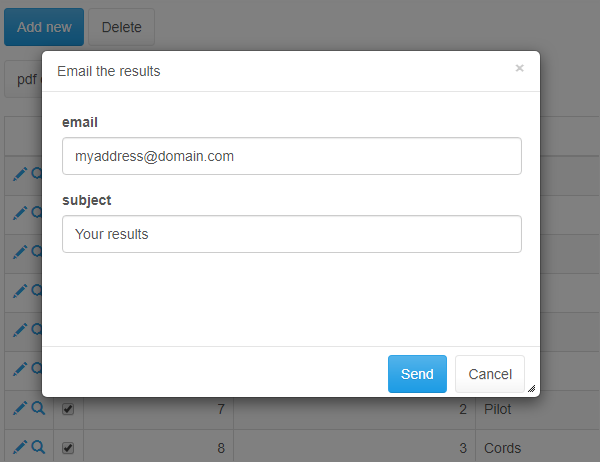
Example 1. Email the results dialog
Let's say you have a page that provides the results of a test where you want to implement a Email the results button.
To ask the user for the email and its subject, add the following code to the Client before section of the Custom button:
return ctrl.dialog( {
title: 'Email the results',
fields: [{
name: 'email',
value: 'myaddress@domain.com'
},
{
name: 'subject',
value: 'Your results'
}],
ok: 'Send',
cancel: 'Cancel'
});
This dialog appears after the user clicks the button.
You can access email and subject fields in the Server part of the button the same way you use any other parameter, i.e., using parameters["email"] and parameters["subject"] respectively.
Here is the complete code of the Server event that sends the email using the entered data.
string email = parameters["email"];
string from = "admin@test.com";
string msg = "Hello there\n<b>Best regards</b>";
string subject = parameters["subject"];
XVar result;
result = MVCFunctions.runner_mail(new XVar("to", email, "subject", subject, "body", msg, "from", from));
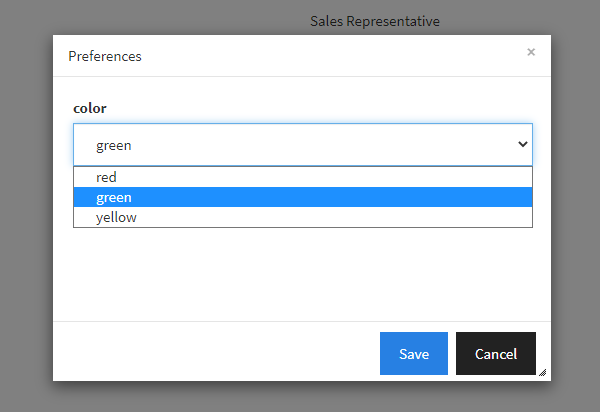
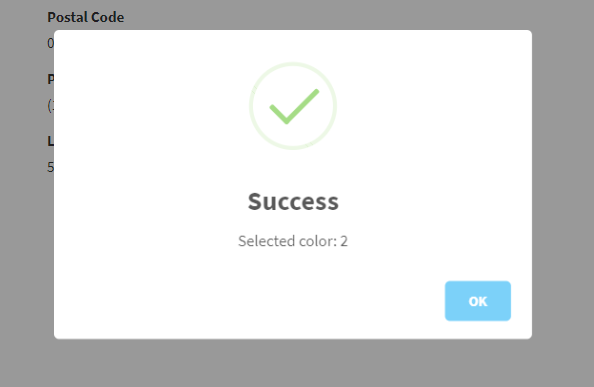
Example 2. Dialog with a lookup wizard
Display a dialog with the list of colors and confirm the selected color after user clicks Save.
return Runner.Dialog( {
title: 'Preferences',
fields: [{
name: 'color',
type: 'lookup',
value: 2,
options:
[
[1,'red'],
[2,'green'],
[3,'yellow']
]
}],
ok: 'Save',
cancel: 'Cancel',
beforeOK: function( popup, controls ) {
swal('Success', 'Selected color: ' + controls[0].val(), 'success');
}
});
And here is what this code will display
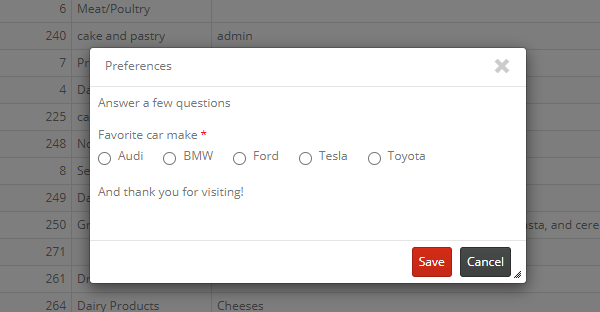
Example 3. Dialog with radio-buttons
We also add some text before and after the input control, make radio buttons display horizontally and also make this field required. Note that we add a couple of <br> at the end of the header to push down the content below it.
return Runner.Dialog( {
title: 'Preferences',
header: 'Answer a few questions<br><br>',
bottom: 'And thank you for visiting!',
fields: [{
name: 'Favorite car make',
type: 'radio',
required: true,
horizontal: true,
options:
[
[1,'Audi'],
[2,'BMW'],
[3,'Ford'],
[2,'Tesla'],
[2,'Toyota']
]
}],
ok: 'Save',
cancel: 'Cancel'
});
And here is what this code will display:
Note 1
When using Runner.Dialog() function it makes sense to combine it with beforeOK() function to perform some action when user clicks OK.
Note 2
When using a lookup control you have two ways to specify values. In the first case display value is the same as control value.
field.options = [ 'red', 'green', 'yellow' ]
In the second case display value and control value can be different.
field.options = [
[1,'red'],
[2,'green'],
[3,'yellow']
]
Here is what would the code above displays after user clicks 'Save'.
Note 3
You can, of course. display data from the database as a lookup. When you use a Custom button you can pull data from the database in the Server part, pass it to ClientAfter event and use it there to prepare field.options array. Another option is to retrieve data in server side event like BeforeDisplay and pass it to Javascript using setProxyValue() function.
Note 4
When you use Runner.Dialog() function you can use controls array to access values of controls on that dialog. I.e. controls[0].val() gives you the value of the first control, controls[1].val() gives you the value of the second control etc. See Example 2 that uses this approach.
More examples:
•How to create a PDF file and save it to the output folder
•How to save the View page as PDF from the List page
•How to email the current page as PDF
•How to email selected records as separate PDF files
See also: