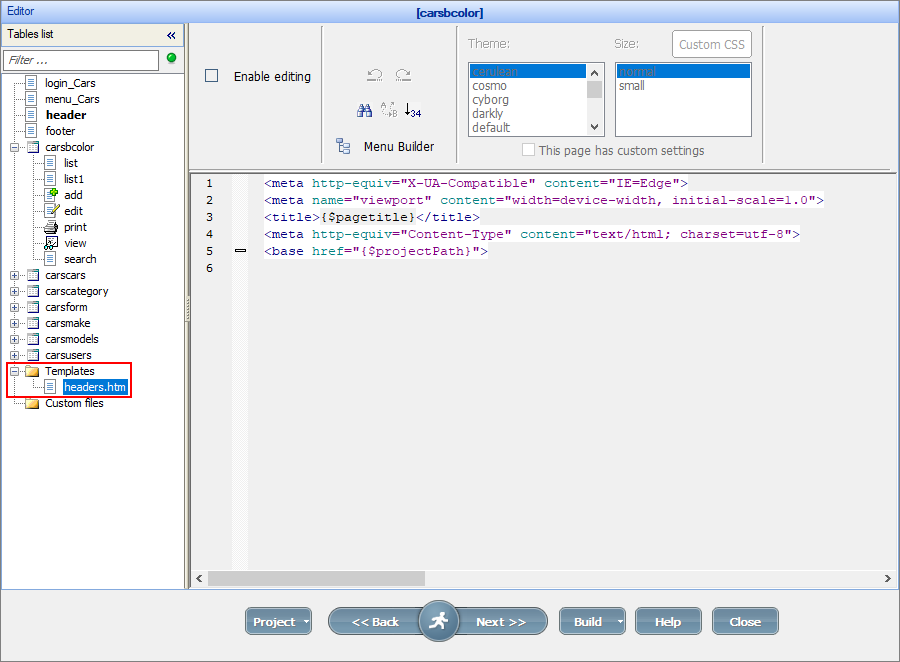
You can access and edit the <head> section of your HTML templates directly on the Style Editor screen.
The <head> section is a container for metadata and is placed between the <html> tag and the <body> tag.
HTML metadata is data about the HTML document. Metadata is not displayed on the page.
Metadata typically defines the document title, character set, styles, and other meta information.
The following tags describe metadata: <title>, <base>, <link>, <meta>, <style>, <script> and <noscript>.
To learn more about the metadata tags, visit https://www.w3.org/TR/html52/document-metadata.html
Accessing and editing the <head> section
You can access the headers.htm file responsible for the <head> section. Proceed to the Editor screen -> Templates -> headers.htm to do so.

Example 1
If you want, for example, to add a favicon to the project, add the following line to the headers.htm file:
<LINK rel="shortcut icon" type="image/png" href="https://example.com/favicon.png"/>
Here is how a full <head> section may look like:
<!DOCTYPE HTML>
<HTML lang="en">
<HEAD>
<META CHARSET="UTF-8">
<BASE HREF="https://www.example.com/">
<TITLE>An application title</TITLE>
<LINK REL="STYLESHEET" HREF="default.css">
<LINK REL="STYLESHEET ALTERNATE" HREF="big.css" TITLE="Big Text">
<SCRIPT SRC="support.js"></SCRIPT>
<META NAME="APPLICATION-NAME" CONTENT="Long headed application">
<LINK rel="shortcut icon" type="image/png" href="https://example.com/favicon.png"/>
</HEAD>
<BODY>
...
Example 2
Add an external Javascript file and make it available on all pages of your application. Here is the line that you can add:
<script defer project="analytics" src="https://example.com/analytics.js"></script>
And here is how <head> section is going to look:
<meta http-equiv="X-UA-Compatible" content="IE=Edge">
<meta name="viewport" content="width=device-width, initial-scale=1.0">
<title>{$pagetitle}</title>
<meta http-equiv="Content-Type" content="text/html; charset=utf-8">
<script defer project="analytics" src="https://example.com/analytics.js"></script>
<base href="{$projectPath}">
See also:
•Configuring ASP.NET apps using Web.config