Quick jump |
|
|
|
Click the Project button and select one of the options from the dropdown list to create a new project, open or save an existing one, or configure the settings of a project.
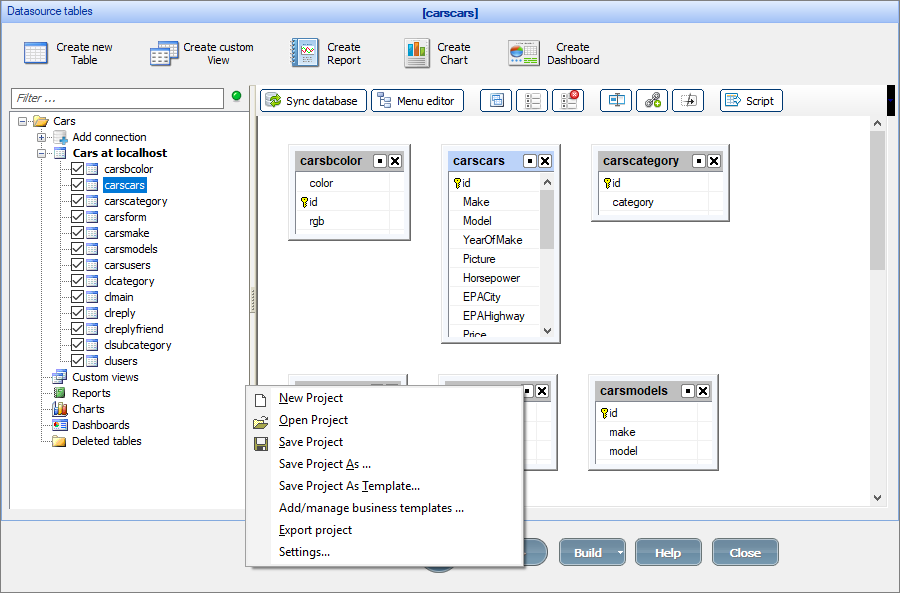
To create a new project, click the Project button, and select New Project. When you create a new project, you have two options:
•Create a new project from scratch by selecting Blank application.
•Create a project from the template.
For more information about built-in templates, see About templates.
With ASPRunnerPro, you can save all your settings in a single project file, so you don't have to go through the individual files every time you need to change something.
Each project in ASPRunnerPro saves the files to its directory, which contains the following subdirectories:
•backup - stores backup copies of your project. The name of the backup file contains the date and time of its creation (i.e., Project4.2019-11-09 10_08_00.w.zip).
•tmp - a temporary storage for the visual templates and other files.
•output - a directory with output files. You can set the output directory manually on the Output directory screen.
•source - contains additional files to be included in the build.
•styles - contains project styles and color schemes.
•business - contains business templates added to this project.
•visual - contains modified visual templates that were changed on the Editor screen in HTML mode.
The default directory for a new project is C:\Projects\project_name. The project file is saved in the project directory as project_name.aspr.
If you upload the project files to the web server using third-party FTP client software, you must upload the entire contents of the output directory.
When you make a backup of your project, you should include all files and subdirectories in the project directory except backup, output and tmp subdirectories.
To open an existing project, select Open project.
If you want to save the current project under a different name - for development purposes or to create a backup - select the Save Project As option. This action creates a new project directory and saves the necessary files into it. Pressing CTRL+S anywhere in the software will save the project as well.
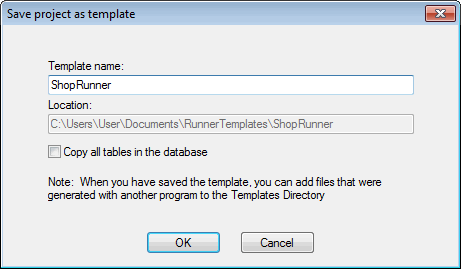
Saving your project as a Template
You can save your project as a template.
In this case, your database, the project file, and all the files edited with the Editor are saved.
Note: the Save Project As Template option is available only for the MySQL, SQL Server, and MS Access projects.
When saving the project as a template, you need to type in the template name. The template is saved in the Business Templates Directory (by default in C:\Users\<username>\Documents\ASPRunnerProTemplates\template_name).
Note: after your template is saved, you can add files that are not generated by ASPRunnerPro to the template directory.
The new template becomes available on the list of templates when you create a new project.
You can also add a thumbnail image to the template to be displayed on the templates list. Place an image named preview.gif (JPG and PNG formats are supported as well) to the template folder. The image size should be 130x97.
Add template to existing project
You can create a new project using two templates or add a template to an existing project. To avoid rewriting the template tables over the existing ones, all ASPRunnerPro business template tables and files have a prefix. For instance, Cars template tables will be named carscars, carsmake, carscategory etc.
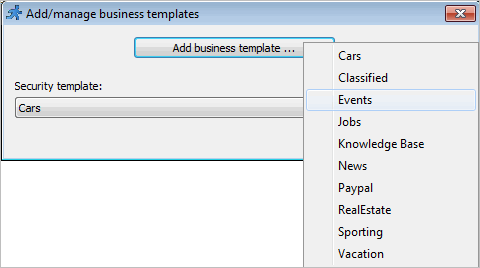
If you have added multiple templates to the project, you can choose one to inherit the security settings from in the Security template dropdown box.
If you add more than one template to the project, it is not guaranteed to run smoothly. This is what you need to do to add two or more templates to the same project:
•Create a temporary project using the second template
•Proceed to the AfterAppInit event and copy the code there. Close the temporary project without saving.
•Open your original project and paste this code to the end of AfterAppInit event.
Export your project into a single .zip archive with the Export project option. This action exports the essentials like the project name, its settings, dashboards/charts/reports, and events.
You can also export the project database structure, as well as extra data like the images, styles, and layouts.

The exported project is saved to the project folder. The file name is generated using a template: %project_name%yyyymmdd_hhmmss.zip.
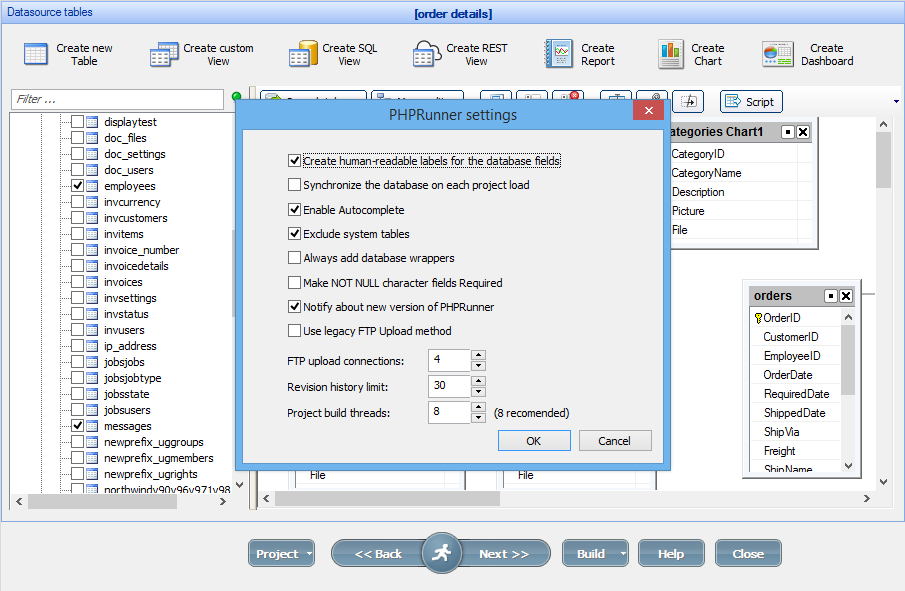
•Use the Create human-readable labels for the database fields option to convert the field names into a more understandable format. For example, if this option is enabled, the field name id is displayed as Id, last_name as Last Name, FirstName as First Name, etc.
•Use the Synchronize the database on each project load option to enable/disable the automatic database synchronization. We recommend using this option for small or local databases. For more information about database synchronization, see Datasource tables: Synchronize database.
•To increase or decrease the upload speed of the project, change the number of FTP upload connections.
•The Enable Autocomplete option enables Intellisense that provides autocomplete popups and function calltips in the Event Editor.
•The Exclude system tables option excludes system tables from the list of tables (i.e., the Users table, Lookup tables, etc.).
•Use the Always add database wrappers option to add wrappers to all names of fields and tables. When this option is disabled, the database wrappers are added only to the field names containing spaces, and service field names. When this option is used, dbo.MyTable will appear as [dbo].[MyTable] (this example uses SQL Server syntax).
•Use the Make not NULL character fields required option to make the character fields with the selected Not NULL checkbox required in the generated app.
•If you select the Notify about new version of ASPRunnerPro option, a message appears in the lower-left corner when the newer version becomes available. For more information, see Updating ASPRunnerPro.
•In the newer versions of ASPRunnerPro we use a more advanced version of the CURL library which may not work on some computers. In this case you can try Use legacy FTP upload method.
•The Revision history limit option defines the number of page revisions to be saved in the Editor.
See also: